Powered by Blogger.
Showing posts with label Tools. Show all posts

OWASP ZAP: Penetration Testing Tool for Testing Web Applications


 OWASP ZAP

The OWASP Zed Attack Proxy (ZAP) is one of the world’s most popular free security tools and is actively maintained by hundreds of international volunteers*. It can help you automatically find security vulnerabilities in your web applications while you are developing and testing your applications. It's also a great tool for experienced pentesters to use for manual security testing.


Please help us to make ZAP even better for you by answering the ZAP User Questionnaire!

For general information about ZAP:
  • Homepage - the official ZAP page on the OWASP wiki (includes a donate button;)
  • Twitter - official ZAP announcements (low volume)
  • Blog - official ZAP blog
  • Monthly Newsletters - ZAP news, tutorials, 3rd party tools, and featured contributors
  • Swag! - official ZAP swag that you can buy, as well as all of the original artwork released under the CC License

For help using ZAP:

Information about the official ZAP Jenkins plugin:
To learn more about ZAP development:
  • Source Code - for all of the ZAP related projects
  • Wiki - lots of detailed info
  • Developer Group - ask questions about the ZAP internals
  • Crowdin (GUI) - help translate the ZAP GUI
  • Crowdin (User Guide) - help translate the ZAP User Guide
  • OpenHub - FOSS analytics
  • Bounty Source - Vote on ZAP issues (you can also donate money here, but 10% taken out)
  • Bug Bounty Program - please use this to report any potential vulnerabilities you find in ZAP

Justification

Justification for the statements made in the tagline at the top;)

Popularity:

ToolsWatch Annual Best Free/Open Source Security Tool Survey:
Contributors:

REFLECTOR Burp Suite Plugin: Find Reflected XSS on Page in Real-time


REFLECTOR v1.0

Burp Suite extension is able to find reflected XSS on the page in real-time while browsing on the website and include some features as:
  • Highlighting of reflection in the response tab.
  • Test which symbols is allowed in this reflection.
  • Analyze of reflection context.
  • Content-Type whitelist.

Usage

After plugin install you just need to start work with the tested web-application. Every time when reflection is found, reflector defines severity and generates burp issue. 

Each burp issue includes detailed info about the reflected parameter, such as:

  • Symbols that allowed in this reflection.
  • Highlighting of reflection value in response.
  • Reflection context analyze.

Allowed Sybmols Analyse


When the reflection is found an option "Aggressive mode" is activated, the reflector will check which of special-symbols are displayed on this page from vulnerable parameters. For this action, reflector composes additional requests for each reflected parameter. In the example, while he was working with elkokc.ml website reflector is generated issue with a detailed information about reflection. There are 3 reflections for "search" parameter and each of them pass special symbols. Because of the possibility of displaying special characters issue severity is marked as high. Every time when reflection is found reflector define severity and generate burp issue.

Context Analyse

In the "Check context" mode reflector it does not only show special characters that are reflected the page but also figure out a character that allows breaking the syntax in the page code. In the example, you may see server response by reflector extension. Parameter "search" was sent with a payload - p@y<"'p@y. As a result, it was reflected a few times in different contexts.


  • reflection with next characters - ',", < and the double quote allow to exit from this context and write HTML code.
  • reflection with next characters - ", < and the bracket allow to inject HTML-tags.
  • reflection with next characters - ',", < and the single quote allow to exit from js variable context and write malicious code.


In the issue information it's marked as:


  • Context char - a character that allows breaking the syntax.
  • Other chars - other chars that are reflected without context. 

Reflection Navigation

Navigation by arrow buttons in the response tab.

Settings


  • Scope only - allow reflector to work only with a scope added websites.
  • Aggressive mode - reflector generates an additional request with a test payload.
  • Check context - activate check context mode.

Moreover, you can manage content-types whitelist with which reflector plugin should work. But if you will use another type except for text/HTML, this can lead to slowdowns in work.

Respected Authors

Shvetsov Alexandr
Dimitrenko Egor


Cloud Security Suite: Auditing Tool For AWS Infrastructure


Cloud security suite one-stop tool for auditing the security posture of AWS infrastructure

Pre-requisites

[Python 2.7
pip
git]

Installation

[git clone https://github.com/SecurityFTW/cs-suite.git
cd cs-suite/
sudo python setup.py]
Note - Generate a set of ReadOnly AWS keys which the tool will ask to finish the installation process.

Virtual Environment installation

(So you don't mess with the already installed python libraries)
[pip install virtualenvironmentwrapper]
Add it to the respective rc file of your shell (bashrc/zshrc) (for fish shell users check virtualfish)
[echo "source /usr/local/bin/virtualenvwrapper.sh" >> ~/.bashrc]
source the file
[source ~/.bashrc]
Run env:
[cd cs-suite/
mkvirtualenv cssuite
workon cssuite
pip install -r requirements-virtual.txt
aws configure]
Once the installation is done, the tool will ask you for the AWS keys and region. These two are mandatory for the tool to work.

Run

[python cs.py]

Documentation 

Installation and running CS Suite:

Cloud Security Suite - Installation and Initiation of an AWS Audit


Cloud Security Suite - Auditing a Windows Instance

Cloud Security Suite - Auditing a Linux Instance


DumpsterFire Toolset - "Security Incidents In A Box"


DumpsterFire Toolset - "Security Incidents In A Box!"

The DumpsterFire Toolset is a modular, menu-driven, cross-platform tool for building repeatable, time-delayed, distributed security events. Easily create custom event chains for Blue Team drills and sensor/alert mapping. Red Teams can create decoy incidents, distractions, and lures to support and scale their operations. Turn paper tabletop exercises into controlled "live fire" range events. Build event sequences ("narratives") to simulate realistic scenarios and generate corresponding network and filesystem artifacts.

The toolset is designed to be dynamically extensible, allowing you to create your own Fires (event modules) to add to the included collection of toolset Fires. Just write your own Fire module and drop it into the FireModules directory. The DumpsterFire toolset will auto-detect your custom Fires at startup and make them available for use.

Author

Joe Gervais (TryCatchHCF)

Tutorial

See my CactusCon 2017 slides (included in the project). The slides are written to stand on their own, providing background, approaches, specific use cases, and more. They'll put everything in context, and also won't put you to sleep. Unless they do put you to sleep, in which case you probably needed some rest anyway, so really we all come out ahead here.

Files & Directories

dumpsterFireFactory.py – Menu-driven tool for creating, configuring, scheduling, and executing DumpsterFires

FireModules/ – Directory that contains subdirectories of Fires, each subdirectory is a specific Category of Fires to keep your Fire modules organized. Fires are added to a DumpsterFire to create a chain of events and actions.

DumpsterFires/ – Directory containing your collection of DumpsterFires

igniteDumpsterFire.py – Headless script, invoked at the command line with the filename of the DumpsterFire you wish to execute. Useful for igniting distributed DumpsterFires.

testFireModule.py – Utility script for unit testing the Class methods of your custom Fire modules, without the hassle of running through the entire DumpsterFire Factory process to debug. Also useful for running a single Fire to check your settings. testFireModule.py will prompt you for configuration settings were applicable.

__init__.py files – Required to make Python treat directories as containing Python packages, allows DumpsterFire toolset to find and load Fire modules.

Requirements

Run DumpsterFire Factory

[$ ./dumpsterFireFactory.py]

theHarvester: Information Gathering Tool

theHarvester is a tool for gathering e-mail accounts, subdomain names, virtual
hosts, open ports/ banners, and employee names from different public sources
(search engines, PGP key servers).

Is a really simple tool, but very effective for the early stages of a penetration
test or just to know the visibility of your company on the Internet.

The sources are:

Passive:
--------
-google: google search engine  - www.google.com

-googleCSE: google custom search engine

-google-profiles: google search engine, specific search for Google profiles

-bing: microsoft search engine  - www.bing.com

-bingapi: microsoft search engine, through the API (you need to add your Key in
          the discovery/bingsearch.py file)

-dogpile: Dogpile search engine - www.dogpile.com

-pgp: pgp key server - mit.edu

-linkedin: google search engine, specific search for Linkedin users


-vhost: Bing virtual hosts search

-twitter: twitter accounts related to an specific domain (uses google search)

-googleplus: users that works in target company (uses google search)

-yahoo: Yahoo search engine

-baidu: Baidu search engine

-shodan: Shodan Computer search engine, will search for ports and banner of the
         discovered hosts  (http://www.shodanhq.com/)


Active:
-------
-DNS brute force: this plugin will run a dictionary brute force enumeration
-DNS reverse lookup: reverse lookup of IPs discovered in order to find hostnames
-DNS TDL expansion: TLD dictionary brute force enumeration


Modules that need API keys to work:
----------------------------------
-googleCSE: You need to create a Google Custom Search engine(CSE), and add your
 Google API key and CSE ID in the plugin (discovery/googleCSE.py)
-shodan: You need to provide your API key in discovery/shodansearch.py


Dependencies:
------------
-Requests library (http://docs.python-requests.org/en/latest/)
[pip install requests]

VHostScan: HTTP Virtual Host Scanner

VHostScan

A virtual host scanner that can be used with pivot tools, detect catch-all scenarios, aliases, and dynamic default pages. First presented at SecTalks BNE in September 2017 (slidedeck).

Key Benefits

  • Quickly highlight unique content in catch-all scenarios
  • Locate the outliers in catch-all scenarios where results have dynamic content on the page (such as the time)
  • Identify aliases by tweaking the unique depth of matches
  • Wordlist supports standard words and a variable to input a base hostname (for e.g. dev.%s from the wordlist would be run as dev.BASE_HOST)
  • Work over HTTP and HTTPS
  • Ability to set the real port of the web server to use in headers when pivoting through ssh/nc
  • Add simple response headers to bypass some WAF products
  • Identify new targets by using reverse lookups and append to wordlist

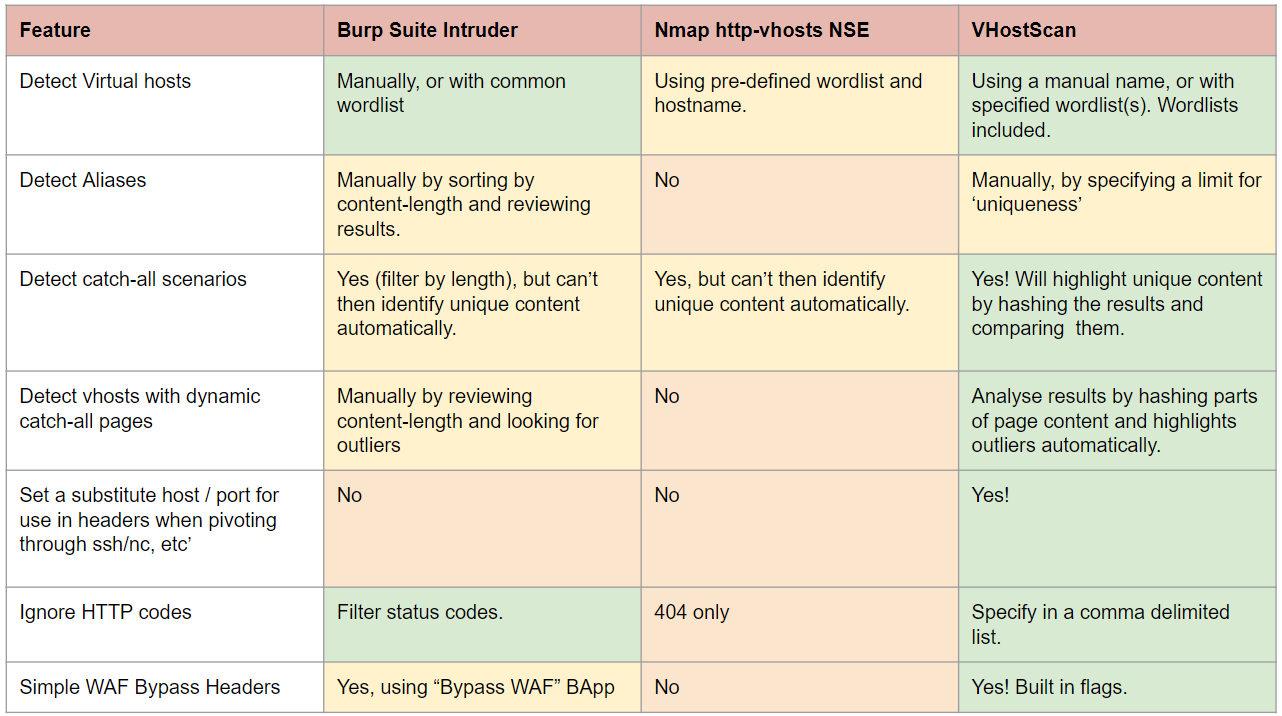
Product Comparisons


Install Requirements

Using pip install via:
[$ pip install -r requirements.txt]

 Usage

ArgumentDescription
-h, --helpDisplay help message and exit
-t TARGET_HOSTSSet the target host.
-b BASE_HOSTSet host to be used during substitution in wordlist (default to TARGET).
-w WORDLISTSSet the wordlist(s) to use. You may specify multiple wordlists in comma delimited format (e.g. -w "./wordlists/simple.txt, ./wordlists/hackthebox.txt" (default ./wordlists/virtual-host-scanning.txt).
-p PORTSet the port to use (default 80).
-r REAL_PORTThe real port of the webserver to use in headers when not 80 (see RFC2616 14.23), useful when pivoting through ssh/nc etc (default to PORT).
--ignore-http-codes IGNORE_HTTP_CODESComma separated list of http codes to ignore with virtual host scans (default 404).
--ignore-content-length IGNORE_CONTENT_LENGTHIgnore content lengths of specificed amount.
--first-hitReturn first successful result. Only use in scenarios where you are sure no catch-all is configured (such as a CTF).
--unique-depth UNIQUE_DEPTHShow likely matches of page content that is found x times (default 1).
--sslIf set then connections will be made over HTTPS instead of HTTP.
--fuzzy-logicIf set then all unique content replies are compared and a similarity ratio is given for each pair. This helps to isolate vhosts in situations where a default page isn't static (such as having the time on it).
--no-lookupsDisbale reverse lookups (identifies new targets and append to wordlist, on by default).
--rate-limitAmount of time in seconds to delay between each scan (default 0).
--random-agentIf set, each scan will use a random user-agent from a predefined list.
--user-agentSpecify a user agent to use for scans.
--wafIf set then simple WAF bypass headers will be sent.
-oN OUTPUT_NORMALNormal output printed to a file when the -oN option is specified with a filename argument.
-oG OUTPUT_GREPABLEGrepable output printed to a file when the -oG is specified with a filename argument.
-oJ OUTPUT_JSONJSON output printed to a file when the -oJ option is specified with a filename argument.

Usage Examples

Note that a number of these examples reference 10.10.10.29. This IP refers to BANK.HTB, a retired target machine from HackTheBox (https://www.hackthebox.eu/).

Quick Example

The most straightforward example runs the default wordlist against example.com using the default of port 80:
[$ VHostScan.py -t example.com]

Click on this image to enlarge it.

Port forwarding

Say you have an SSH port forward listening on port 4444 forwarding traffic to port 80 on example.com's development machine. You could use the following to make VHostScan connect through your SSH tunnel via localhost:4444 but format the header requests to suit connecting straight to port 80:
[$ VHostScan.py -t localhost -b example.com -p 4444 -r 80]

STDIN 

VHostScan Supports piping from other applications and will treat information passed to VHostScan as wordlist data, for example:
[$ cat bank.htb | VHostScan.py -t 10.10.10.29]


STDIN and WordList

You can still specify a wordlist to use along with stdin. In these cases, wordlist information will be appended to stdin. For example:
[$ echo -e 'a.example.com\b.example.com' | VHostScan.py -t localhost -w ./wordlists/wordlist.txt]

Fuzzy Logic

Here is an example of fuzzy logic enabled. You can see the last comparison is much more similar than the first two (it is comparing the content, not the actual hashes):

Running the tests

The project includes a small battery of tests. It's really simple to run the tests:
[pip install -r test-requirements.txt]
[pytest] 
If you're thinking of adding a new feature to the project, consider also contributing with a couple of tests. A well-tested codebase is a sane codebase. :)

Portia: Automated Privilege Escalation

Portia aims to automate a number of techniques commonly performed on internal network penetration tests after a low privileged account has been compromised.


  • Privilege escalation
  • Lateral movement
  • Convenience modules
Portia is a genus of jumping spider that feeds on other spiders – known for their intelligent hunting behavior and problem-solving capabilities usually only found in larger animals.

The video that shows privilege escalation via impersonation tokens and running of post-exploitation modules.

Dependencies
apt-get update
apt-get install -y autoconf automake autopoint libtool pkg-config freetds-dev
pip install pysmb tabulate termcolor xmltodict pyasn1 pycrypto pyOpenSSL dnspython netaddr python-nmap
cd /opt
git clone https://github.com/CoreSecurity/impacket
python setup.py install
cd /opt
git clone https://github.com/libyal/libesedb.git && cd libesedb
./synclibs.sh
./autogen.sh
cd /opt
git clone https://github.com/csababarta/ntdsxtract && cd ntdsxtract
python setup.py install
pip install git+https://github.com/pymssql/pymssql.git
cd /opt
git clone https://github.com/volatilityfoundation/volatility && cd volatility
python setup.py install
cd /opt
git clone https://github.com/SpiderLabs/portia

Radium - Python Keylogger


--> Coded by: Mehul Jain(mehulj94@gmail.com)
--> Github: https://github.com/mehulj94
--> Twitter: https://twitter.com/_b00geyman_
--> For windows only
Features

→ Applications and keystrokes logging
→ Screenshot logging
→ Drive tree structure
→ Logs sending by email
→ Password Recovery for
  • Chrome
  • Mozilla
  • Filezilla
  • Core FTP
  • CyberDuck
  • FTPNavigator
  • WinSCP
  • Outlook
  • Putty
  • Skype
  • Generic Network
→ Cookie stealer
 → Keylogger stub update mechanism 
→ Gather system information 
  • Internal and External IP
  • Ipconfig /all output 
  • Platform
Usage

→ Download the libraries if you are missing any.
→ Set the Gmail username and password and remember to check allow connection from less secure apps in Gmail settings.
→ Set the FTP server. Make the folder Radium in which you'll store the new version of exe.
→ Set the FTP ip, username, password.
→ Remember to encode the password in base64.
→ Set the originalfilename variable in copytostartup(). This should be equal to the name of the exe.
→ Make the exe using Pyinstaller
→ Keylogs will be mailed after every 300 key strokes. This can be changed.
→ Screenshot is taken after every 500 key strokes. This can be changed.
→ Remember: If you make this into exe, change the variable "originalfilename" and "coppiedfilename" in function copytostartup().
→ Remember: whatever name you give to "coppiedfilename", should be given to checkfilename in deleteoldstub().

Things to work on

→ Persistence
→ Taking screenshots after a specific time. Making it keystrokes independent.
→ Webcam logging
→ Skype chat history stealer
→ Steam credential harvester

BaRMIe - Java RMI Enumeration Tool

BaRMIe - Java RMI Enumeration And Attack Tool

BaRMIe is a tool for enumerating and attacking Java RMI (Remote Method Invocation) services.
RMI services often expose dangerous functionality without adequate security controls, however RMI services tend to pass under the radar during security assessments due to the lack of effective testing tools. In 2008 Adam Boulton spoke at AppSec USA (YouTube) and released some RMI attack tools which disappeared soon after, however even with those tools a successful zero-knowledge attack relies on a significant brute force attack (~64-bits/9 quintillion possibilities) being performed over the network.

The goal of BaRMIe is to enable security professionals to identify, attack, and secure insecure RMI services. Using partial RMI interfaces from existing software, BaRMIe can interact directly with those services without first brute forcing 64-bits over the network.

Disclaimer:

BaRMIe was written to aid security professionals in identifying insecure RMI services on systems which the user has prior permission to attack. Unauthorised access to computer systems is illegal and BaRMIe must be used in accordance with all relevant laws. Failure to do so could lead to you being prosecuted. The developers of BaRMIe assume no liability and are not responsible for any misuse or damage caused by this program.

Usage:

Use of BaRMIe is straightforward. Run BaRMIe with no parameters for usage information.
[java -jar BaRMIe.jar]
 Enumeration mode (-enum) extracts details of objects that are exposed through an RMI registry service and lists any known attacks that affect the endpoint.

Attack mode (-attack) first enumerates the given targets, then provides a menu system for launching known attacks against RMI services.

A single target can be specified on the command line. Alternatively BaRMIe can extract targets from a simple text file or nmap output.

No Vulnerable Targets Identified?
Great! This is your opportunity to help improve BaRMIe! BaRMIe relies on some knowledge of the classes exposed over RMI so contributions will go a long way in improving BaRMIe and the security of RMI services.

If you have access to JAR files or source code for the target application then producing an attack is as simple as compiling code against the relevant JAR files. Retrieve the relevant remote object using the LocateRegistry and Registry classes and call the desired methods.

Alternatively look for remote methods that accept arbitrary objects or otherwise non-primitive parameters as these can be used to deliver deserialization payloads. More documentation on attacking RMI and producing attacks for BaRMIe will be made available in the near future.

Alternatively, get in touch, and provide as much detail as possible including BaRMIe -enum output and ideally the relevant JAR files.

Attack Types
BaRMIe is capable of performing three types of attacks against RMI services. A brief description of each follows. Further technical details will be published in the near future at https://nickbloor.co.uk/. In addition to this, I presented the results of my research at 44CON 2017 and the slides can be found here: BaRMIe - Poking Java's Back Door.

1. Attacking Insecure Methods
The first and most straightforward method of attacking insecure RMI services is to simply call insecure remote methods. Often dangerous functionality is exposed over RMI which can be triggered by simply retrieving the remote object reference and calling the dangerous method. The following code is an example of this:
[//Get a reference to the remote RMI registry service
Registry reg = LocateRegistry.getRegistry(targetHost, targetPort);
//Get a reference to the target RMI object
Foo bar = (Foo)reg.lookup(objectName);
//Call the remote executeCommand() method
bar.executeCommand(cmd);]

2. Deserialization via Object-type Paraeters
Some RMI services do not expose dangerous functionality, or they implement security controls such as authentication and session management. If the RMI service exposes a method that accepts an arbitrary Object as a parameter then the method can be used as an entry point for deserialization attacks. Some examples of such methods can be seen below:
[public void setOption(String name, Object value);
public void addAll(List values);]
3. Deserialization via Illegal Method Invocation
Due to the use of serialization, and insecure handling of method parameters on the server, it is possible to use any method with non-primitive parameter types as an entry point for deserialization attacks. BaRMIe achieves this by using TCP proxies to modify method parameters at the network level, essentially triggering illegal method invocations. Some examples of vulnerable methods can be seen below:
[public void setName(String name);
public Long add(Integer i1, Integer i2);
public void sum(int[] values); ]
 The parameters to each of these methods can be replaced with a deserialization payload as the method invocation passes through a proxy. This attack is possible because Java does not attempt to verify that remote method parameters received over the network are compatible with the actual parameter types before deserializing them.

Seccubus - Easy Automated Vulnerability Scanning, Reporting And Analysis


Seccubus automates regular vulnerability scans with various tools and aids security people in the fast analysis of its output, both on the first scan and on repeated scans.

On repeated scan delta reporting ensures that findings only need to be judged when they first appear in the scan results or when their output changes.

Seccubus 2.x is only actively developed and maintained branch and all support for Seccubus V1 has officially been dropped.

Seccubus V2 works with the following scanners:

  • Nessus
  • OpenVAS
  • Skipfish
  • Medusa (local and remote)
  • Nikto (local and remote)
  • NMap (local and remote)
  • OWASP-ZAP (local and remote)
  • SSLyze
  • Medusa
  • Qualys SSL labs
  • testssl.sh (local and remote)

For more information visit [Seccubus]


Seccubus Docker container

Usage

Running a full stack (db/app/frontend) in a single container. And get an interactive shell
[docker run -it seccubus/seccubus /bin/bash]
By default the container holds a mysql server that runs and stores data locally. If you want data persistency there are two options:
Connect the container to a remote mysql/MariaDB database with environment viariables:
[docker run -ti seccubus/seccubus -e DBHOST=dns.name.of.db.host \
-e DBPOSRT=3306 \
-e DBNAME=name.of.database \
-e DBUSER=db.username \
-e DBPASS=password \
/bin/bash]
Or, mount a data volume with a db directory on it
[mkdir data
mmdir data/db
docker run -it seccubus/seccubus -v ($pwd)/data:/opt/seccubus/data /bin/bash] 
Please be aware that you can only run one container at a time if you mount a local directory on /var/lib/mysql.

Running a scan

Run the following command to start the scan 'ssllabs' in workspace 'Example' (this workspace is created by default if you use the local mysql database)
[docker run -ti seccubus/seccubus scan Example ssllabs]
Please be aware that you need soem data persistency here or the data will be stored in a local database that will be deleted whent he container terminates

Running a scheduler

You can run a docker container as a scheduler. This will make it run cron and allow your crontab to execute scans.You can populate the crontab by either placing a file called crontab in the /opt/seccubus/data volume or puting the lines of you crontab in evironement variables starting with CRON_
[docker run -e "STACK=cron" -e "CRON_1=* 0 * * * bin/do-scan -w Example -s ssllabs" -ti seccubus/seccubus]
This will spin up a container that executes scan ssllabs from workspace Example at midnight every night. You can set the TZ vairable to control the timezone.

Controlling TLS certificates

The Seccubus container is TLS enabled by default. The environment variable TLS controls this behaviour. Of it is set to anything other then yes, TLS is turned off.
There are three ways to control the certificate:
  • Do nothing : Self signed certificates will be generated for you
  • Populate the variables TLSCERT and TLSKEY : The contents will be placed in /opt/seccubus/data/seccubus.pem and /opt/seccubus/data/seccubus.key and used
  • Put the certificates in the files seccubus.pem and seccubus.key on a data volume and mount it on /opt/seccubus/data
Show this help message
[docker run -ti seccubus/seccubus help]

Default command

If you don't specify a command to docker run
[docker run seccubus/seccubus]
The web server access log and error log will be tailed to the screen.

Other options

You can set the following environment variables:
  • STACK - Determines which part of the stack is run
    • full - Run everything
    • front - Start apache to serve the html/javascript frontend (this requires that the APIURL variable is set too)
    • api - Start apache to serve the json api at / (starts MariaDB too if required)
    • web - Start apache to serve both the html/javascript frontend and the json
    • perl - Do not start apache, just use this container as an perl backend
  • DBHOST, DBPORT, DBNAME, DBUSER, DBPASS - Database connection parameters
    • If DBHOST/DBPORT are set to 127.0.0.1/3306 the local MariaDB instance is started
  • APIURL - Path to the API url
    •  Set this if your set STACK to front to redirect the API calls to an alternative relative or absolute URL.
  • BASEURI - Base URI for seccubus
    • Server the application at the value provided
  • SMTPSERVER - IP address or host name of an SMTP server to be used for notifications
  • SMTPFROM - From address used in notifications
  • TICKETURL_HEAD/TICKETURL_TAIL - If these are set ticket numberrs will be linked to this URL
  • SSHKEY1, SSHKEY2, SSHKEY3 .. SSHKEY9
    • The content of this environment variable will stored in the file /opt/seccubus/.ssh/SSHKEY1 etc.
    • You can use this mechanism to provide ssh keys that are used to start remote scans
  • HTTP_AUTH_HEADER - Set the http authentication header
    • If you are using something like OpenAM to authenticate your users, this allows you to set which http request header contains the user that OpenAM detected
  • TZ - Set the timezone of the container
  • TLS - Controls TLS behaviour yes means TLS is on, otherwise TLS is off. TLS is on by default.
  • JIT_GROUP - Controls JIT provisioning of users
  • CRON_MAIL_TO - Mail cron messages to this addres
  • CRON_* - Add these lines to crontab in alphabetical order

Blazy - Modern Login Bruteforcer Which Also Tests For CSRF, Clickjacking, Cloudflare and WAF


Blazy is a modern login page bruteforcer.

Features
  • Easy target selections
  • Smart form and error detection
  • CSRF and Clickjacking Scanner
  • Cloudflare and WAF Detector
  • 90% accurate results
  • Checks for login bypass via SQL injection
  • Multi-threading
  • 100% accurate results
  • Better form detection and compatibility
Requirements
  • Beautiful Soup
  • Mechanize
Usages
Open your terminal and enter.
[git clone https://github.com/UltimateHackers/Blazy]
Now enter the following command
[cd Blazy] 
Let's install the required modules before running Blazy
[pip install -r requirements.txt]

Now run Blazy by entering
[python blazy.py]
Now enter your desired login page URL and Blazy will do its thing: